
Área técnica
Recomendaciones INFINITA
El proceso de alicatado necesita conocimientos previos para un correcto uso del material. Ponemos a su disposición un espacio donde conocer las recomendaciones para el uso, instalación y mantenimiento de nuestros productos.
Es importante que el soporte sobre el que se va a instalar la placa esté en buenas condiciones para un acabado de calidad. Se debe realizar el proceso de instalación de la placa siguiendo estas indicaciones:
APLICACIÓN DEL ADHESIVO
Aplicar el adhesivo sobre la superficie de colocación y se extender con la parte lisa de la llana. Posteriormente someter a la operación de “peinado” en línea recta y perpendicular. Es importante realizar esta operación en el menor tiempo posible para evitar que el adhesivo no afecte a la adherencia de la pieza.
DOUBLE GLUING: It’s compulsory to apply a double glue application on the back and on the surface of the slab. The application must not exceed the advised glue thickness recommended by the manufacturer.
COLOCACIÓN DE LA PLACA:
Importante el trabajo de coordinación del equipo de instaladores para colocar la placa lo mas aproximadamente posible a su ubicación definitiva. De este modo se minimiza la posibilidad de tener que corregir o reajustar la pieza. Con la placa colocada y el adhesivo fresco, realizar la operación de golpe con una maza de goma para extraer todo el aire que haya quedado encapsulado entre las placas adheridas durante la colocación.
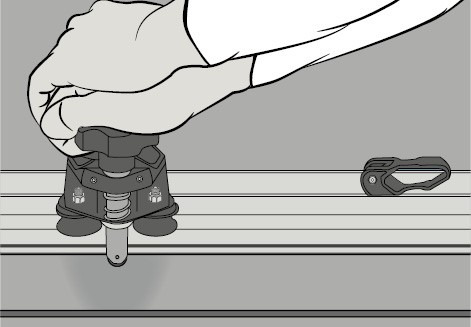
LEVELING SYSTEM:
Es necesario el uso de un sistema de nivelación para formatos grandes para ayudar a conseguir acabados completamente planos y uniformes. El sistema nivelación se aplica ejerciendo presión sobre las placas contiguas durante el proceso de instalación mientras el adhesivo esté fraguando, por ello tenemos que tomar ciertas precauciones para evitar que la fuerza ejercida pueda afectar negativamente a la adherencia. Una vez completamente fraguado el adhesivo quitar los soportes, haciendo separar la parte sobresaliente de la base mediante un ligero golpe transversal.
PROCESO DE REJUNTADO:
Las juntas de colocación deben estar secas, limpias. La aplicación del material de rejuntado se realizará según las instrucciones del fabricante. Se debe extender la pasta de rejuntado utilizando una llana de goma adecuada rellenando las juntas en toda su profundidad con movimientos diagonales, esperar el tiempo indicado por el fabricante para iniciar a la limpieza que debe ser retirado con una esponja humedecida en diagonal a las juntas.
LIMPIEZA FINAL DE OBRA:
A proper cleaning conduction after the installation it is a must to do in order to remove all the residues and general waste. It is advised to use a light acid cleaning detergent without toxic gases. In case we will use a epoxy joint or in a resin surface, it’s recommended to do the final cleaning with an specific epoxy joint cleaner.
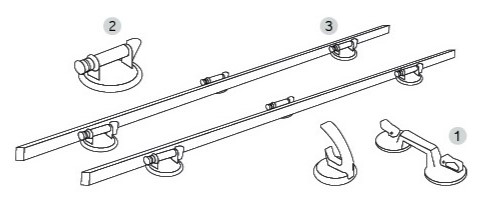
Several workmen will be needed to carry large-format slabs.
Será necesario el uso de ventosas y se podrán usar en todas sus variantes (1).
Para piezas con superficie texturizada se recomienda el uso de ventosas que dispongan de una goma blanda, que garantice la adherencia de las mismas (2).
To handle the slabs more easily and prevent the risk of warpage, carrying bars should be used (3).
The best solution is a rigid frame, with suction cups that grip the slab along all sides. This prevents warpage and allows just two workmen to carry it.
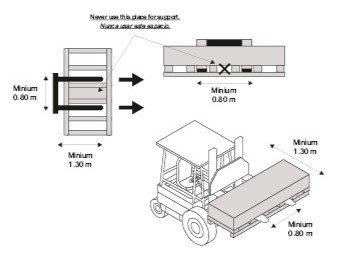
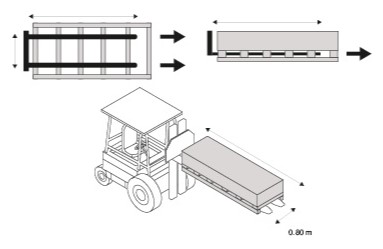
Para una correcta manipulación de los cajones, se usará una carretilla elevadora con palas de 2,5 metros de longitud extendidas al máximo.
En condiciones normales, situar las palas en la mitad de la parte más larga del pallet para sujetar la máxima profundidad.
Never use the central opening in the crates to load them.
Despite the large dimensions of the tiles, they can be cut, drilled and their edges finished. This can be done on the worksite with appropriate equipment.
CORTE CON GUÍAS DE CORTE EN SECO
01. Primero se coloca la pieza cerámica en la mesa de trabajo.
02. Mark the cutting line, and then fix the guide rail into place.
03. A continuación, se raya con el rodel la pieza, marcando los dos primeros centímetros hacía atrás y continuando con el resto de la placa, marcando con fuerza constante hasta el extremo contrario.
04. To separate the two parts, exert pressure with a pair of pliers until a breaking sound is heard.
05. Use the edge of the workbench to snap the two pieces apart, exerting the necessary pressure.
CUTTING WITH A GUIDE RAIL AND RADIAL TILE SAW
We can also make use of a guide and a radial with water.
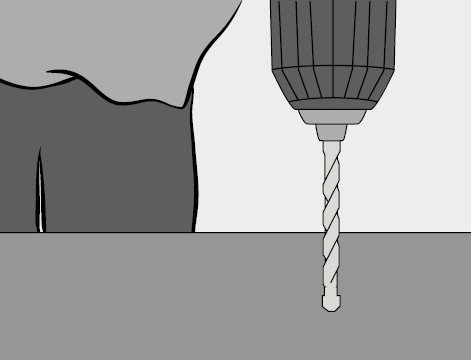
DRILLING AND MAKING HOLES
To make holes, do not use drills in the hammer mode. Start at a low speed and refrigerate the bit with water.